
Wednesday 30 November 2011
Tuesday 22 November 2011
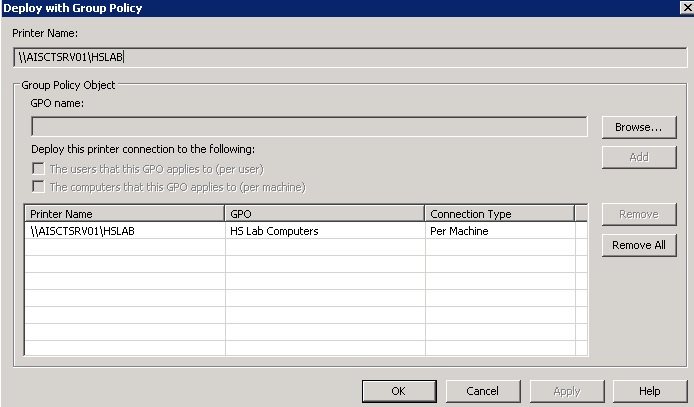
Printer deployment Windows 2008 GPO
http://technet.microsoft.com/en-us/library/cc731292.aspx
http://technet.microsoft.com/en-us/library/cc731292.aspx

 http://social.technet.microsoft.com/Forums/en-US/winserverGP/thread/858ada63-d71d-4f35-b23d-4281d7f6dd56

Tuesday 8 November 2011
SONICWALL TZ-210 Firewall - SNMP
Management
*** Website (IP)
*** SSH (Default port 22)
*** SNMP
SNMP (Simple Network Management Protocol) - use to monitor status of Firewall using UDP (User Datagram Protocol).
SonicWall supports SNMP v1/v2c and all relevant MIB (Mangement Information Base II) groups except egp and at.
To use SNMP
** Enable SNMP (tick box) for all interfaces on the SonicWall
**** Log into Management interface - System - Administration - Enable SNMP Checkbox - Configure
 ** Enable SNMP per Interface
 ** Download MIBs from Website
** Load MIBs into 3rd party management software ie: Nagios
** Download MIBs from Website
** Load MIBs into 3rd party management software ie: Nagios


Thursday 3 November 2011
Powershell Script to join domain as elevated user
runas /user:AISCT\administrator "powershell.exe Set-Executionpolicy Unrestricted"
runas /user:AISCT\administrator "powershell.exe -noexit Add-Computer -DomainName AISCT -cred AISCT\administrator; restart-computer"
Elevating UAC via Batchfile & running Powershell script
RunAs
http://www.computerhope.com/runas.htm
http://www.softtreetech.com/24x7/archive/53.htm
Running batch file on Win7 to open powershell with elevated permissions
Using runas to elevate
runas /user:AISCT\administrator "powershell.exe Set-Executionpolicy Unrestricted"
Atheros L1 Gigabit NIC - Windows 7 32bit - disconnecting from Network
Problems with this NIC
* Atheros L1 Gigabit NIC - hangs,
* Disconnects from network
* Refuse to accept Static assigned IP.
* Accept static assigned IP - can ping network but not browse internet as it keeps on losing the Default Gateway setting.
Driver
http://199.91.153.158/jcl8z3i2zlog/momwqimjnew/%5Bwikidrivers.com%5D+Atheros_L1_v2.4.7.29.exe
Reinstallation of this driver & a reboot fixed this problem
Thursday 27 October 2011
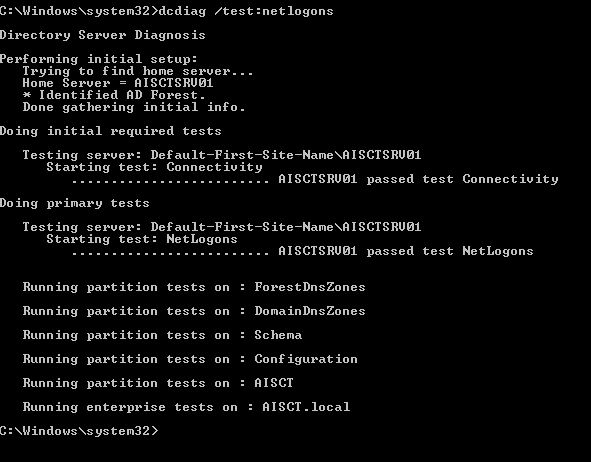
Troubleshooting Netlogon security issues on Win2008R2
Verify services running
start - run - services.msc
check DFS Replication & Netlogon STARTED
Check share
run cmd as elevated user
net share netlogon
 Netlogon & Sysvol location
Sysvol - %systemroot%\SYSVOL\sysvol\
Netlogon - %systemroot%\SYSVOL\sysvol\
Netlogon & Sysvol location
Sysvol - %systemroot%\SYSVOL\sysvol\
Netlogon - %systemroot%\SYSVOL\sysvol\\SCRIPTS
If these shares not present check DFS
test
start cmd as elavated user *start - cmd* press Cntrl+Shift+Enter
dcdiag /test:netlogons


Tuesday 18 October 2011
Windows 2008 Domain Rename
from CMD
NETDOM computernam ************.****** /add:newcomputername.local
File cannot be loaded because the execution of scripts is disabled on this system error in PowerShell
File cannot be loaded because the execution of scripts is disabled on this system error in PowerShell
Open Powershell as administrator and type
Get-ExectionPolicy
An overview of the policy levels:
Restricted: Individual cmdlets can run, but not saved Powershell scripts. This is the default setting.
AllSigned: Scripts can run, but must have a digital signature even if written on the local computer. Prompts you before running scripts from trusted publishers.
RemoteSigned: Scripts written on the local computer do not need a digital signature, but any script downloaded from outside (email, IM, Internet) must have a signature to execute.
Unrestricted: Any script can run, but scripts downloaded from outside will run with a warning.
By default its set to Restricted
To change it type
Set-ExecutionPolicy Unrestricted
To run a script from a batch file
runas /user:AISCT\administrator "powershell.exe -noexit e:\newdomain.ps1"
My ps script
Set-Restrictionpolicy Unrestricted
Add-Computer -DomainName AISCT -cred AISCT\administrator
Friday 14 October 2011
Ubuntu - Resolving Name Resolution problems
Check correct IP setup
cat /etc/network/interface
Check Name Server Setups
cat /etc/resolv.conf
nameserver ***.***.***.***
nameserver ***.***.***.***
restart networking or server
sudo /etc/init.d/networking restart
sudo reboot 0
Testing:
ping yahoo.com
Windows 7 nonpaged pool Srv error 2017
I'm using a temp Windows 7 Server to share 2 lots of my shared files on-site while I waited for a new Dell Server to be delivered.
So the problem I've been running into is that I use AD & a batch file to automatically map my users to this windows 7 box and their respective home folders & other folders, but my pc users are experiencing problems where they dont' get their drives mapped when they login - you have to either logoff and log back on or rerun the login batch file.
I found this in the eventlog:
Source: srv
Event ID: 2017
Level: Error
The server was unable to allocate from the system nonpaged pool because the server reached the configured limit for nonpaged pool allocations.
Someone suggested changing the following registry settings:
Set the following registry key to ’1′:
HKLM\SYSTEM\CurrentControlSet\Control\Session Manager\Memory Management\LargeSystemCache
and set the following registry key to ’3′:
HKLM\SYSTEM\CurrentControlSet\Services\LanmanServer\Parameters\Size
Followed by a restart of the server service.
Thanks to: http://alan.lamielle.net/2009/09/03/windows-7-nonpaged-pool-srv-error-2017
Tuesday 2 August 2011
Nagios 3.3.1 make install error
Fix
./configure
sed -i 's:for file in includes/rss/\*;:for file in includes/rss/\*.\*;:g' ./html/Makefile sed -i 's:for file in includes/rss/extlib/\*;:for file in includes/rss/extlib/\*.\*;:g' ./html/Makefile and then make fullinstall |
|
 |
Wednesday 27 July 2011
Install Webmin on Ubuntu
Install webmin on ubuntu
Edit /etc/apt/sources.list file
sudo vi /etc/apt/sources.list
Add the following lines
deb http://download.webmin.com/download/repository sarge contrib
deb http://webmin.mirror.somersettechsolutions.co.uk/repository sarge contrib
Save and exit the file
Now you need to import GPG key
wget http://www.webmin.com/jcameron-key.asc
sudo apt-key add jcameron-key.asc
Update the source list
sudo apt-get update
Install webmin
sudo apt-get install webmin
Thursday 14 July 2011
Wednesday 13 July 2011

MS Word - enter code in technical document
Click on Insert - Object - OpenDocument Txt - paste details , save and exit

Right click on the text - go to "borders and shading" - add borders and apply to "text"


Right click on the text - go to "borders and shading" - add borders and apply to "text"

Wednesday 6 July 2011
Nagios Check_website
Define check_website command in commands.cfg
add commands to /usr/local/nagios/etc/objects/commands.cfg
# 'check_website' command definition
define command{
command_name check_website
command_line $USER1$/check_website -H $HOSTADDRESS$
}
Download Plugin and copy to libexec
Download check_website plugin
Copy into /usr/local/nagios/libexec/change file permissions to chmod 775 check_website
Test Plugin
/usr/local/nagios/libexec/ ./check_website -H (hostname) -F (file)
Friday 1 July 2011
Wednesday 29 June 2011
ESET NOD - Manually remove
Remove NOD32 manually
This process is the most critical among all the methods. Apply this method, when all of the above methods fail:
- Restart your computer and start Windows with Safe Mode.
- Click on Start menu and then click on Run.
- Type regedit and hit Enter key of your keyboard.
- From the registry editor find the following keys and delete them: [a] HKEY_CURRENT_USER\Software\ESET
[b] HKEY_LOCAL_MACHINE\Software\ESET
[c] HKEY_LOCAL_MACHINE\Software\Microsoft\Windows\CurrentVersion\Run\egui - Click on Start menu, then go to Control Panel. Later, Folder Options, then View and at last Show hidden files and folders.
- Go to C:\WINDOWS\inf folder and delete INFCACHE.1 file from that folder.
- Now. Restart your computer and after reinstallation, delete the following three folders.
- C:\Program Files\ESET
- C:\Documents and Settings\All Users\Application Data\ESET
- C:\Documents and Settings\%USER%\Application Data\ESET
By following the above steps, you can easily remove ESET NOD32 antivirus totally from your computer.
Thursday 2 June 2011
Monitoring Pervasive PSQL with Nagios
Nagios 3.2.3 monitoring Pervasive PSQL running on Windows 2003 Server
To monitor Pervasive you have to monitor the following 3 executables:
The reason I monitor these executables instead of the service name is because the service name contains 2 brackets and Nagios refuse to monitor them.
Service names:
Pervasive PSQL Relational Engine - Pervasive.SQL(relational)
Pervasive PSQL Transactional Engine - Pervasive.SQL(transactional)
To monitor Pervasive you have to monitor the following 3 executables:
To monitor Pervasive you have to monitor the following 3 executables:
The reason I monitor these executables instead of the service name is because the service name contains 2 brackets and Nagios refuse to monitor them.
Service names:
Pervasive PSQL Relational Engine - Pervasive.SQL(relational)
Pervasive PSQL Transactional Engine - Pervasive.SQL(transactional)
To monitor Pervasive you have to monitor the following 3 executables:
| NTDBSMGR.EXE | ||||||||
| w3sqlmgr.exe | ||||||||
| ntbtrv.exe |
Thursday 19 May 2011
Wednesday 11 May 2011
Friday 6 May 2011
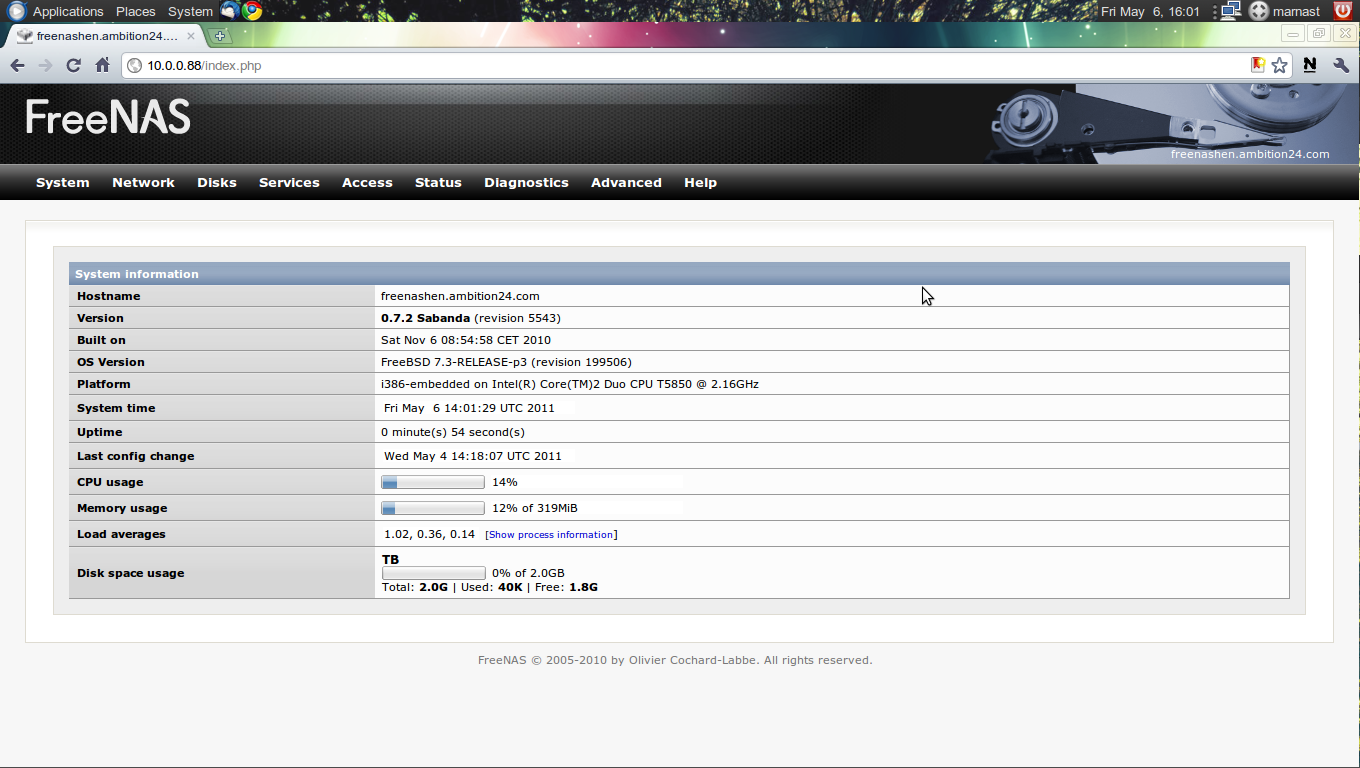
FREENAS 7.2 and FREENAS 8.0
After swearing continuously for 3 days I thought I'd share my experience about FreeNAS 7.2 and 8.0. Saying this·...I have to add that FreeNAS wasn't actually build to be a NAS connected to AD.
FREENAS 8.0
Negative points:
* Don't support AD on WIN 2008, don't give you access to the logs as it did in 7.2 (Diagnostics)
* Is an absolute mission to get AD setup and working (if you lucky)
* Is still hung-up about NETBIOS as in version 7.2
* Shutdown button on website
* Everything including SSH, AD is disabled and need to be explicitly enabled via "Services"
* Pity its build on FreeBSD
* CIFS & Windows Shares now 2 different things
* Website layout a bit confusing at first
* Total revamp from 7.2 to 8.0
* No upgrade option AT ALL from 7.2 to 8.0
* Do not use ZFS when connecting to AD
Positive points
* Nice website layout
* You can enable console messages under Settings
* Support VLAN's
* Support Windows Shares, UNIX, CIFS
* Access website without the :80 port indicator
* System - Reporting is nice
AD Debug Logs
Connect via SSH
Run /usr/local/bin/freenas-debug -a
cat /var/tmp/freenas-debug.txt
/usr/local/bin/freenas-debug ?
Logs folders
Console Logs /var/log/messages/console.log
Machine related logs /var/log/messages
When SSH'ing into the box make sure you've ticked "root" user login under the SSH settings.
When SSH'ing use root and the "Website password" to login.
FreeNAS 8.0


FREENAS 7.2
Positive points
* Access to allot of the system logs from website (fantastic!)
* Much more usable & stable than 8.0
Negative Points
* Require reboot after most changes
After the setup:
* Make a note of the disk setup before you close the window!
* Add the disk & DO NOT FORMAT
* Add a mount point
* Add a share
* Join AD
* Reboot
* Map the share on your AD, add folders, remove the second Everyone user from the share (The Everyone user that don't have any rights)
* Make sure the share is browsable
* Access the website ie http:10.0.0.99:80
AD Setup
When setting up AD you HAVE To do the following:
* Realize NetBIOS is very important to FreeNAS as this is what it use to connect to AD & network
* Enable the following
*** EA
*** Dos Attributes
* Add the Server host name as a user on AD
* don't play around with the "net ad join" command as this will mess up AD completely
FreeNAS 7.2

Monday 18 April 2011
Remotely & Secretly auditing a PC (without user intervention)
Entering WMIC as domain administrator
Pulling installed software, name and versions from Remote PC's
Or you can pipe to .txt file for easier import into xls.
You will be shown the list of software installed on a PC & their versions: ie: and this will be piped to your c drive

Remote audit with a pipe out to c:\

The output file

http://isc.sans.edu/diary.html?storyid=1229
- From Start -- Run "runas /domain\user cmd"
- You'll be shown a new command prompt window - now you are ready to use the WMIC
- "Windows Command Line Interface"
Pulling installed software, name and versions from Remote PC's
- To list software installed on a remote machine use the following syntax
Or you can pipe to .txt file for easier import into xls.
You will be shown the list of software installed on a PC & their versions: ie: and this will be piped to your c drive
Remote audit with a pipe out to c:\
The output file
http://isc.sans.edu/diary.html?storyid=1229
Wednesday 13 April 2011
Ubuntu 10.04 - add a persistent route
route add [-net|-host]netmask gw dev X
Example
route add -net 10.10.10.0 netmask 255.255.255.0 gw 192.168.1.1 dev eth0
route add -host 10.10.1.1 netmask 255.255.255.0 gw 192.168.1.1 dev eth0
route add -host 10.10.1.1 netmask 255.255.255.0 gw 192.168.1.1 dev eth0
Thursday 7 April 2011
Avaya Site Manager 5.0 - setup using Wine on Ubuntu 10.04
- Install Wine
- Install Winetricks
- Install Avaya Site Manager
- Open Winetricks
-- Click on "select a default wine prefix"
---- Click on "Install a windows .dll or component"
------- Select msdac32
If you don't install msdac32 you'll get this error:
marnast@ict-marna:~/.wine/dosdevices/c:/Program Files/Avaya/Site Administration/bin$ wine ASA.exe
fixme:atl:AtlModuleInit SEMI-STUB (0x100100b8 0x1000d1b0 0x10000000)
err:module:attach_process_dlls "odbc32.dll" failed to initialize, aborting
err:module:LdrInitializeThunk Main exe initialization for L"C:\\Program Files\\Avaya\\Site Administration\\bin\\ASA.exe" failed, status c0000005
marnast@ict-marna:~/.wine/dosdevices/c:/Program Files/Avaya/Site Administration/bin$ wine ASA.exefixme:atl:AtlModuleInit SEMI-STUB (0x100100b8 0x1000d1b0 0x10000000)
fixme:win:LockWindowUpdate (0x10200), partial stub!
fixme:win:LockWindowUpdate ((nil)), partial stub!
fixme:shell:MLSetMLHInstance (0x71590000,0x7ed40000) stub
fixme:shell:MLClearMLHInstance (0x71590000)stub
fixme:commdlg:ChooseFontW : unimplemented flag (ignored)
fixme:shell:MLSetMLHInstance (0x71590000,0x7ed40000) stub
fixme:shell:MLClearMLHInstance (0x71590000)stub
Thursday 31 March 2011
SSH setup - between 2 linux boxes without passwords
On Nagios Server
I created /home/nagios/.ssh/
root@Nagi:/home/nagios# ssh-keygen -t dsa
Generating public/private dsa key pair.
Enter file in which to save the key (/root/.ssh/id_dsa): /home/nagios/.ssh/id-dsa
Enter passphrase (empty for no passphrase):
Enter same passphrase again:
Your identification has been saved in /home/nagios/.ssh/id-dsa.
Your public key has been saved in /home/nagios/.ssh/id-dsa.pub.
The key fingerprint is:
d2:f1:3b:2e:8a:8c:3a:db:33:81:ec:57:7e:0a:88:37 root@Nagi
The key's randomart image is:
+--[ DSA 1024]----+
| |
| |
| . |
| . o |
|.. . S . |
|o.o . . . |
|o.Eoo o |
|.+o=.o ... . |
|o++oo.+. .. |
+-----------------+
root@Nagi:/home/nagios#
Nagios Error: Check command not defined anywhere!
Error: Service check command 'check_disk_remote' specified in service 'check_disk_remote' for host 'Nagios-CPT' not defined anywhere!
Location check:
** Plugin located in /usr/local/nagios/libexec/
** Commands.cfg --> is the service defined?
** services.cfg --> is the service defined to be used with a host?
Nagios - Examples check_disk_remote
superman@Nagi:/usr/local/nagios/libexec$ ./check_disk_remote -e ssh -H 10.0.0.110 -w 90 -c 95 -v
superman@10.0.0.110's password:
superman@10.0.0.110's password:
Filesystem 1024-blocks Used Available Capacity Mounted on
/dev/sda1 73986264 1480204 68747724 3% /
percent = 3% warn=90 crit=95
none 504728 236 504492 1% /dev
none 508936 0 508936 0% /dev/shm
none 508936 280 508656 1% /var/run
none 508936 0 508936 0% /var/lock
none 508936 0 508936 0% /lib/init/rw
none 73986264 1480204 68747724 3% /var/lib/ureadahead/debugfs
OK: All Filesystems are below threshold (90/95%) | /=3%;;;0;100
superman@10.0.0.110's password:
superman@10.0.0.110's password:
Filesystem 1024-blocks Used Available Capacity Mounted on
/dev/sda1 73986264 1480204 68747724 3% /
percent = 3% warn=90 crit=95
none 504728 236 504492 1% /dev
none 508936 0 508936 0% /dev/shm
none 508936 280 508656 1% /var/run
none 508936 0 508936 0% /var/lock
none 508936 0 508936 0% /lib/init/rw
none 73986264 1480204 68747724 3% /var/lib/ureadahead/debugfs
OK: All Filesystems are below threshold (90/95%) | /=3%;;;0;100
Nagios - Smartmon monitoring
CHECK_SMARTMON
Define services
I add the following to
Define services
/usr/local/etc/nagios/objects/services.cfg# SMART ad0
define service {
use generic-service
host_name host1,host2,host3
service_description nrpe_check_smart_ad0
check_command check_nrpe2!check_smart_ad0
}
# SMART ad1
define service {
use generic-service
host_name host2
service_description nrpe_check_smart_ad1
check_command check_nrpe2!check_smart_ad1}
Edit SuodersI add the following to
/usr/local/etc/sudoers on the servers being monitored: nagios ALL=(ALL) NOPASSWD: /usr/local/libexec/nagios/check_smartmon -d /dev/ad*
nagios ALL=(ALL) NOPASSWD: /usr/local/libexec/nagios/check_smartmon -d /dev/da*
Add to commands.cfg
command[check_smart_ad0]=/usr/local/bin/sudo /usr/local/libexec/nagios/check_smartmon -d /dev/ad0
command[check_smart_ad1]=/usr/local/bin/sudo /usr/local/libexec/nagios/check_smartmon -d /dev/ad1
ERROR:
superman@Nagi:/usr/local/nagios/libexec$ ./check_smartmon ?
-bash: ./check_smartmon: /usr/local/bin/python: bad interpreter: No such file or directory
If your smartmon don't work --> change the python path in your check_smartmon file - and remove the topline which points to /usr/local/bin/python and replace with /usr/bin/python = Installation = Adjust the first line to your Python binary (e.g. /usr/local/bin/python or /usr/bin/python) and the path to your smartctl binary (e.g. /usr/local/sbin/smartctl or /usr/sbin/smartctl).
Install Smartmon
sudo apt-get install smartmontools
Check_smartmon Examples:
Tuesday 29 March 2011
Nagios Error: Host has no default contacts or contactgroups defined
Warning: Host 'BLALBA' has no default contacts or contactgroups defined!
host definition:
define host{
use generic-host
host_name Scopserve
alias Scopserve
address 172.18.0.30
}
error - generic-host don't have a contact or contactgroup defined.
Setup correct template/hostgroup definition and "use" the correct definition ie:
template.cfg
define host{
name PT-PBX ; The name of this host template
use generic-host ; Inherit default values from the generic-host template
check_period 24x7 ; By default, switches are monitored round the clock
check_interval 5 ; Switches are checked every 5 minutes
retry_interval 1 ; Schedule host check retries at 1 minute intervals
max_check_attempts 10 ; Check each switch 10 times (max)
check_command check-host-alive ; Default command to check if routers are "alive"
notification_period 24x7 ; Send notifications at any time
notification_interval 30 ; Resend notifications every 30 minutes
notification_options d,r ; Only send notifications for specific host states
contact_groups admins ; Notifications get sent to the admins by default
register 0 ; DONT REGISTER THIS - ITS JUST A TEMPLATE
}
New host definition using "CPT-PBX"
define host{
use CPT-PBX
host_name Scopserve
alias Scopserve
address 172.18.0.30
}
Nagios error: "Invalid_Max_Check_Attempts"
Error: Invalid max_check_attempts value for host 'CBD-DC'
Error: Could not register host (config file '/usr/local/nagios/etc/objects/windows.cfg', starting on line 2)
Error processing object config files!
Check:
* Does your generic-host template specify a valid max_check_attempts
* Check hostgroups.cfg defined in /usr/local/nagios/etc/nagios.cfg
* Check hostgroup defined in /usr/local/nagios/etc/objects/templates.cfg
Error: Could not register host (config file '/usr/local/nagios/etc/objects/windows.cfg', starting on line 2)
Error processing object config files!
Check:
* Does your generic-host template specify a valid max_check_attempts
value? If not, you'll need to add it there or to the host definition
itself.
* Host defined in windows.cfg
* Check hostgroups.cfg defined in /usr/local/nagios/etc/nagios.cfg
* Check hostgroup defined in /usr/local/nagios/etc/objects/templates.cfg
Friday 25 March 2011
Nagios - Monitoring Eventlogs on Windows Servers (My Comprehensive Guide)
Monitor DNS events on Windows Servers
define service{
service_description System Eventlog
use generic-service
check_command check_win_eventlog!a!System!.*:+1
max_check_attempts 1
host_name Recruit
contact_groups admins
is_volatile 1
}
define service{
service_description DNS Eventlog
use generic-service
check_command check_win_eventlog!a!DNS!.*:+1
max_check_attempts 1
host_name Recruit
contact_groups admins
is_volatile 1
}
define service{
service_description Directory Service Eventlog
use generic-service
check_command check_win_eventlog!a!Directory Service!.*:+1
max_check_attempts 1
host_name Recruit
contact_groups admins
is_volatile 1
define service{
service_description File Replication Service Eventlog
use generic-service
check_command check_win_eventlog!a!File Replication Service!.*:+1
max_check_attempts 1
host_name Recruit
contact_groups admins
is_volatile 1
}
The bits in red needs to be filled in correctly.
Errors
If eventlog.exe not running you'll get this error message
If errors continue - restart the .exe running on the host
To automate & install the .exe as a service
You will need 'instsrv.exe' and 'srvany.exe' from Microsoft Resource Kit.
Just copy those files together with 'eventlog_agent.exe', 'eventlog_agent.bat' and
'eventlog_agent.reg' into the folder 'c:\programme\eventlog_agent' and run the
batch file. If you want to use a different folder, then you will need to modify
the path in 'eventlog_agent.bat' and 'eventlog_agent.reg'
Autostart
You may put the exe into your Systems Autostart Folder. But this requires that there is
someone logged in.
Uninstall the eventlog_agent
If you used installation method a) or c), then can just delete the Files.
If you used installation method b), then you go into the installation directory
and call "eventlog_agent.bat stop" on the console.
- Copy eventlog_agent files to c:\
- Create folder on c:\ called "programme"
- Create subfolder "eventlog_agent"
- Copy the eventlog_agent files (.exe, .bat, .reg) to c:\programme\eventlog_agent\
- Run eventlog_agent.exe (if doing it manually)
- add "eventlogs.cfg" to nagios.cfg
- Add hosts to eventlogs.cfg
define service{
service_description System Eventlog
use generic-service
check_command check_win_eventlog!a!System!.*:+1
max_check_attempts 1
host_name Recruit
contact_groups admins
is_volatile 1
}
define service{
service_description DNS Eventlog
use generic-service
check_command check_win_eventlog!a!DNS!.*:+1
max_check_attempts 1
host_name Recruit
contact_groups admins
is_volatile 1
}
define service{
service_description Directory Service Eventlog
use generic-service
check_command check_win_eventlog!a!Directory Service!.*:+1
max_check_attempts 1
host_name Recruit
contact_groups admins
is_volatile 1
define service{
service_description File Replication Service Eventlog
use generic-service
check_command check_win_eventlog!a!File Replication Service!.*:+1
max_check_attempts 1
host_name Recruit
contact_groups admins
is_volatile 1
}
The bits in red needs to be filled in correctly.
Errors
If eventlog.exe not running you'll get this error message
| Current Status: |
CRITICAL
(for 0d 0h 1m 57s) |
| Status Information: | An Error occured before state could be read: Connection refused at /usr/local/nagios/libexec/check_win_eventlog.pl line 145. |
If errors continue - restart the .exe running on the host
To automate & install the .exe as a service
You will need 'instsrv.exe' and 'srvany.exe' from Microsoft Resource Kit.
Just copy those files together with 'eventlog_agent.exe', 'eventlog_agent.bat' and
'eventlog_agent.reg' into the folder 'c:\programme\eventlog_agent' and run the
batch file. If you want to use a different folder, then you will need to modify
the path in 'eventlog_agent.bat' and 'eventlog_agent.reg'
Autostart
You may put the exe into your Systems Autostart Folder. But this requires that there is
someone logged in.
Uninstall the eventlog_agent
If you used installation method a) or c), then can just delete the Files.
If you used installation method b), then you go into the installation directory
and call "eventlog_agent.bat stop" on the console.
Thursday 24 March 2011
Using Nagios to monitor Zimbra Servers
Monitoring Zimbra Mail queue's with Nagios
edit
vi /usr/local/nagios/libexec/utils.pm
remove
$PATH_TO_MAILQ = "/usr/bin/mailq";
Add
$PATH_TO_MAILQ ="/opt/zimbra/postfix/sbin/mailq";
Test
/usr/local/nagios/libexec# /usr/local/nagios/libexec/check_mailq xxx.xxx.xxx.xxx 1 -w 100 -c 150
Error
root@Nagi:/usr/local/nagios/libexec# /usr/local/nagios/libexec/check_mailq 10.0.0.251 -w 100 -c 150
ERROR: /opt/zimbra/postfix/sbin/mailq is not executable by (uid 0:gid(0 0))
Fix Error
edit
vi /etc/sudoers
nagios ALL=(zimbra) NOPASSWD: /usr/local/nagios/libexec/check_clamav.pl
nagios ALL=(zimbra) NOPASSWD: /usr/local/nagios/libexec/check_mail
NRPE Checks
NRPE
command[check_zimbra_route_lookup_handler]=/usr/lib/nagios/plugins/check_http -H localhost -p 7072
command[check_zimbra_spell_checker]=/usr/lib/nagios/plugins/check_http -H localhost -p 7780
command[check_zimbra_pop3_real]=/usr/lib/nagios/plugins/check_pop -H localhost -p 7110
command[check_zimbra_pop3s_real]=/usr/lib/nagios/plugins/check_pop -H localhost -p 7995 -S
command[check_zimbra_imap_real]=/usr/lib/nagios/plugins/check_imap -H localhost -p 7143
command[check_zimbra_imaps_real]=/usr/lib/nagios/plugins/check_imap -H localhost -p 7993 -S
command[check_zimbra_mailq]=/usr/lib/nagios/plugins/check_mailq -w 100 -c 150 -M postfix
command[check_zimbra_clamd]=/usr/lib/nagios/plugins/check_clamd -H localhost
command[check_zimbra_mysql]=/usr/lib/nagios/plugins/check_mysql -s /opt/zimbra/db/mysql.sock
command[check_zimbra_mysql_logger]=/usr/lib/nagios/plugins/check_mysql -s /opt/zimbra/logger/db/mysql.sock
command[check_zimbra_amavisd]=/usr/lib/nagios/plugins/check_smtp -H localhost -p 10024 -e '220 [127.0.0.1] ESMTP amavisd-new service ready'
command[check_zimbra_lmtp]=/usr/lib/nagios/plugins/check_smtp -H localhost -p 7025 -e '220 zimbra.example.com Zimbra LMTP ready'
command[check_zimbra_postfix_amavis]=/usr/lib/nagios/plugins/check_smtp -H localhost -p 10025 -e '220 zimbra.example.com ESMTP Postfix'
check_clamav.pl
command[check_zimbra_clamd_sig]=sudo -u zimbra /usr/lib/nagios/plugins/contrib/check_clamav.pl -w 3 -c 5
/etc/sudoers
nagios ALL=(zimbra) NOPASSWD: /usr/lib/nagios/plugins/contrib/check_clamav.pl
Validate SSL Cert
service_description Zimbra SSL Certificate
command_line $USER1$/check_http -S -H zimbra.example.com -C 10
Check LDAP
service_description Zimbra LDAP
check_command check_ldap_with_HOST!zimbra.example.com!dc=de
edit
vi /usr/local/nagios/libexec/utils.pm
remove
$PATH_TO_MAILQ = "/usr/bin/mailq";
Add
$PATH_TO_MAILQ ="/opt/zimbra/postfix/sbin/mailq";
Test
/usr/local/nagios/libexec# /usr/local/nagios/libexec/check_mailq xxx.xxx.xxx.xxx 1 -w 100 -c 150
Error
root@Nagi:/usr/local/nagios/libexec# /usr/local/nagios/libexec/check_mailq 10.0.0.251 -w 100 -c 150
ERROR: /opt/zimbra/postfix/sbin/mailq is not executable by (uid 0:gid(0 0))
Fix Error
edit
vi /etc/sudoers
nagios ALL=(zimbra) NOPASSWD: /usr/local/nagios/libexec/check_clamav.pl
nagios ALL=(zimbra) NOPASSWD: /usr/local/nagios/libexec/check_mail
NRPE Checks
NRPE
command[check_zimbra_route_lookup_handler]=/usr/lib/nagios/plugins/check_http -H localhost -p 7072
command[check_zimbra_spell_checker]=/usr/lib/nagios/plugins/check_http -H localhost -p 7780
command[check_zimbra_pop3_real]=/usr/lib/nagios/plugins/check_pop -H localhost -p 7110
command[check_zimbra_pop3s_real]=/usr/lib/nagios/plugins/check_pop -H localhost -p 7995 -S
command[check_zimbra_imap_real]=/usr/lib/nagios/plugins/check_imap -H localhost -p 7143
command[check_zimbra_imaps_real]=/usr/lib/nagios/plugins/check_imap -H localhost -p 7993 -S
command[check_zimbra_mailq]=/usr/lib/nagios/plugins/check_mailq -w 100 -c 150 -M postfix
command[check_zimbra_clamd]=/usr/lib/nagios/plugins/check_clamd -H localhost
command[check_zimbra_mysql]=/usr/lib/nagios/plugins/check_mysql -s /opt/zimbra/db/mysql.sock
command[check_zimbra_mysql_logger]=/usr/lib/nagios/plugins/check_mysql -s /opt/zimbra/logger/db/mysql.sock
command[check_zimbra_amavisd]=/usr/lib/nagios/plugins/check_smtp -H localhost -p 10024 -e '220 [127.0.0.1] ESMTP amavisd-new service ready'
command[check_zimbra_lmtp]=/usr/lib/nagios/plugins/check_smtp -H localhost -p 7025 -e '220 zimbra.example.com Zimbra LMTP ready'
command[check_zimbra_postfix_amavis]=/usr/lib/nagios/plugins/check_smtp -H localhost -p 10025 -e '220 zimbra.example.com ESMTP Postfix'
check_clamav.pl
command[check_zimbra_clamd_sig]=sudo -u zimbra /usr/lib/nagios/plugins/contrib/check_clamav.pl -w 3 -c 5
/etc/sudoers
nagios ALL=(zimbra) NOPASSWD: /usr/lib/nagios/plugins/contrib/check_clamav.pl
Validate SSL Cert
service_description Zimbra SSL Certificate
command_line $USER1$/check_http -S -H zimbra.example.com -C 10
Check LDAP
service_description Zimbra LDAP
check_command check_ldap_with_HOST!zimbra.example.com!dc=de
Monday 21 March 2011
Event ID 13508, Source: NtFrs
The File Replication Service is having trouble enabling replication from BELL-AD-PRIMARY to SERVER1 for c:\windows\sysvol\domain using the DNS name Bell-AD-Primary.ambition24.com. FRS will keep retrying.
Following are some of the reasons you would see this warning.
[1] FRS can not correctly resolve the DNS name Bell-AD-Primary.ambition24.com from this computer.
[2] FRS is not running on Bell-AD-Primary.ambition24.com.
[3] The topology information in the Active Directory for this replica has not yet replicated to all the Domain Controllers.
Troubleshooting:
* Check if SYSVOL is shared by using the "net share" command on all Servers?
* Is the FRS running on all Servers?
* Run dcdiag and netdiag on both servers. to check
replication please run repadmin /showreps >rep.txt.
Sunday 6 March 2011
Cisco Router Startup
On startup the System Bootstrap (BootStrap) process:
- Runs the POST
- Find IOS in flash memory (Tell router how to load by def flash)
- IOS load and look for a valid configuration "startup config" stored in RAM or NVRAM
- Once the IOS is loaded the POST information will be displayed
- If no startup config is found in NVRAM the Router will go into "setup mode
Acronyms
POST - Power on Self Test
IOS - Internetwork Operating System
EEPROM - Electronically Erasable Programmable Read Only Memory
NVRAM - Nonvolatile Read Only Memory
Cisco Router - Online Simulator
Cisco Online Router Sim
http://www.techexams.net/testsim/techsim.php#
http://www.techexams.net/testsim/techsim.php#
Monday 31 January 2011
"Faulting Application mstsc.exe" Event ID: 1000
"Faulting Application mstsc.exe" Event ID: 1000
Event ID 1000
Enabling Network Level Authentication on Windows XP Service Pack 3 for access to Server 2008 via Remote Desktop
Solution When connecting to a Windows 2008 Server using remote desktop from a Windows XP client running service pack 2 or earlier, you get the following error message:
The remote computer requires Network Level Authentication, which your computer does not support.
To enable NLA in XP machines; first install XP SP3, then edit the registry settings on the XP client machine to allow NLA
• Configure Network Level Authentication
1. Click Start, click Run, type regedit, and then press ENTER.
2. In the navigation pane, locate and then click the following registry subkey: HKEY_LOCAL_MACHINE\SYSTEM\CurrentControlSet\Control\Lsa
3. In the details pane, right-click Security Packages, and then click Modify.
4. In the Value data box, type tspkg. Leave any data that is specific to other SSPs, and then click OK.
5. In the navigation pane, locate and then click the following registry subkey: HKEY_LOCAL_MACHINE\SYSTEM\CurrentControlSet\Control\SecurityProviders
6. In the details pane, right-click SecurityProviders, and then click Modify.
7. In the Value data box, type credssp.dll. Leave any data that is specific to other SSPs, and then click OK.
8. Exit Registry Editor.
9. Restart the computer.
Subscribe to:
Posts (Atom)