Start - run - gpedit.msc
- Administrative Templates
- System
- Remote Assistance
-- Offer Remote Assistance
-- R/click properties -enable
Close all
F1 - Tools
Offer Remote Assistance - -> Click on add to favourites
To use Remote Assistance --> just open F1 -> goto favourites - Remote Access and type in the IP Address
Friday, 14 August 2009


Add-MailboxPermissions
Add-MailboxPermissions
Add-MailboxPermission username -User towhom -Accessrights Fullaccess
Accessrights
- Fullaccess
- SendAs
- ExternalAccount
- DeleteItem
- ReadPermission
- ChangePermission
- ChangeOwner
Add-MailboxPermission username -User towhom -Accessrights Fullaccess
Accessrights
- Fullaccess
- SendAs
- ExternalAccount
- DeleteItem
- ReadPermission
- ChangePermission
- ChangeOwner
Friday, 7 August 2009
Unix - 4 steps to installing a file
1. Download it with the wget command + correct url
2. tar the file - unzip
3. ./configure the file using correct user & group
4. make install
2. tar the file - unzip
3. ./configure the file using correct user & group
4. make install
Installing Nagios 3.1.2 and Cacti 0.8.7e on Ubuntu server 9
I installed Ubuntu Server 9 onto VirtualBox.
I created a downloads folder
Used this link as instructions -
http://nagios.sourceforge.net/docs/3_0/quickstart-ubuntu.html
but this link contains invalid url's so I had to go and find these:
Then wget these:
wget http://sourceforge.net/projects/nagios/files/nagios-3.x/nagios-3.1.2/nagios-3.1.2.tar.gz/download
wget http://sourceforge.net/projects/cacti/cacti-0.8.7e.tar.gz/download/
Nagios Configuration:
./configure --with-command-group=nagcmd
make all
useradd nagios
make install-config
make install-commandmode
Make install
Config nagios to start automatically
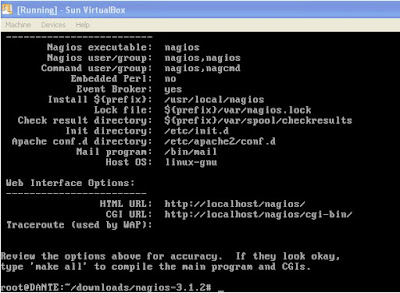
My Nagios Config
Nagios executable: nagios
Nagios user/group: nagios,nagios
command user/group: nagios,nagcmd
install :/usr/local/nagios
lock file: ${prefix}/var/nagios.lock
chcek result directory: %{prefix}/var/spool/checkresults
init directory: /ect/init.d
apach conf.d: /ect/apache2/conf.d
mail program: /bin/mail
host os: linux-gnu
web interface options
HTML URL http://localhost/nagios
CGI URL: http://localhost/nagios/cgi-bin
I created a downloads folder
Used this link as instructions -
http://nagios.sourceforge.net/docs/3_0/quickstart-ubuntu.html
but this link contains invalid url's so I had to go and find these:
Then wget these:
wget http://sourceforge.net/projects/nagios/files/nagios-3.x/nagios-3.1.2/nagios-3.1.2.tar.gz/download
wget http://sourceforge.net/projects/cacti/cacti-0.8.7e.tar.gz/download/
Nagios Configuration:
./configure --with-command-group=nagcmd
make all
useradd nagios
make install-config
make install-commandmode
Now change the email address in the contacts file & save it :!wq
vi /usr/local/nagios/etc/objects/contacts.cfg
then setup password for Apache
htpasswd -c /user/local/nagios/htpasswd.users nagiosadmin
Restart Apache
/etc/init.d/apache2 reload
extract the nagios plugins
tar xzf nagios-plugins-1.4.10.tar.gz
./configure --with-nagios-user=nagios --with-nagios-group=nagios
Make
Make install
Config nagios to start automatically
My Nagios Config
Nagios executable: nagios
Nagios user/group: nagios,nagios
command user/group: nagios,nagcmd
install :/usr/local/nagios
lock file: ${prefix}/var/nagios.lock
chcek result directory: %{prefix}/var/spool/checkresults
init directory: /ect/init.d
apach conf.d: /ect/apache2/conf.d
mail program: /bin/mail
host os: linux-gnu
web interface options
HTML URL http://localhost/nagios
CGI URL: http://localhost/nagios/cgi-bin
Tuesday, 4 August 2009
BES - Services
BES Services Running on Win2003 Srv
BESAlert.exe
BlackBerryAgent.exe
BlackBerryController.exe
BlackBerryDispatcher.exe
BlackBerryRouter.exe
BlackBerrySyncServer.exe
ITAdminServer.exe
BESAlert.exe
BlackBerryAgent.exe
BlackBerryController.exe
BlackBerryDispatcher.exe
BlackBerryRouter.exe
BlackBerrySyncServer.exe
ITAdminServer.exe
Tuesday, 21 July 2009
Event - Source AutoEnrollment ID: 15
Automatic certificate enrollment for DOMAIN\user failed to contact the active directory (0x8007052b). Unable to update the password. The value provided as the current password is incorrect.
Enrollment will not be performed.
---------------------------------
http://support.microsoft.com/kb/310461
Cause:
RESOLUTION
Enrollment will not be performed.
---------------------------------
http://support.microsoft.com/kb/310461
Cause:
This problem may occur if the Autoenrollment feature cannot reach an Active Directory domain controller. In a Microsoft Windows NT 4.0 domain, Active Directory is not available. Therefore, the Autoenrollment feature cannot work. In an Active Directory domain that has Microsoft Windows 2000 or later domain controllers, the problem may be caused by a DNS name resolution or by network connectivity issue.
 Back to the top
RESOLUTIONFor a Microsoft Windows XP-based computer or a Microsoft Windows Server 2003-ba...
For a Microsoft Windows XP-based computer or a Microsoft Windows Server 2003-based computer that is joined to a Windows NT 4.0 domain, to turn off the Autoenrollment feature in the Local Group Policy, follow these steps on the local workstation:
- Click Start, click Run, type gpedit.msc, and then press ENTER.
- In the left pane, expand Computer Configuration, expand Windows Settings, expand Security Settings, and then expand Public Key Policies.
- Double-click Autoenrollment Settings.
- Click Do not enroll certificates automatically.
- Click OK.
- Repeat steps 2 through 5, but in step 2, expand User Configuration, expand Windows Settings, expand Security Settings, and then expand Public Key Policies.
- Close the Group Policy window.
For a computer that is a member of a Windows 2000 or later Active Directory domain, make sure that the domain member has network connectivity with at least one domain controller.
After you have determined that you have good Internet Protocol (IP) connectivity between the member and a domain controller, correct the DNS address in the IP properties of the workstation. To do this, follow these steps:
After you have determined that you have good Internet Protocol (IP) connectivity between the member and a domain controller, correct the DNS address in the IP properties of the workstation. To do this, follow these steps:
- Start the Network Connections tool in Control Panel.
- Right-click Local Area Connection, and then click Properties.
- Click Internet Protocol (TCP/IP), and then click Properties.
- Type the correct DNS address in the Preferred DNS server box.
- Click OK.
Subscribe to:
Posts (Atom)